This is an old revision of the document!
Table of Contents
ID MRZ RECOGNITION
1. What the MRZ is
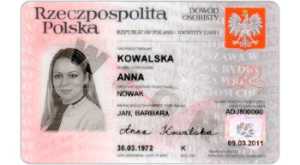
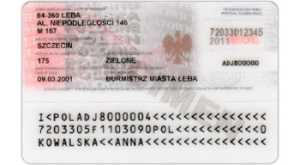
MRZ (ang. machine readable zone) – is a place in a different kind of documents, that contains data written in shorter way and using a special, machine readable letters. This zone helps computers to read the document in, for example, airport. Data in MRZ zone in personal ID are structured in 3 lines, 30 characters per line. It also contains characters from A-Z, number 0-9 and special character “<”, like in passports.
| Example of ID card | |
|---|---|
 |  |
2. Application description
Application are written in Python language (ver 2.7) with additional library- OpenCV. As a classifier in our neural network we use KNN (k-Nearest Neighbors) algorithm, that is already implemented in OpenCV library.
After application launch we can see menu:
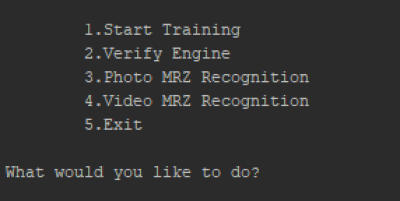
2.1 Start Training
Supervised learning- it is a function, that generate neccessary data for KNN classifier.
Working algorithm:
| Step | Description |
|---|---|
| 1 | Shows file prepared by user which contains pattern data (characters are written using OCR-B font). In this file every character is prepared several time in a different size.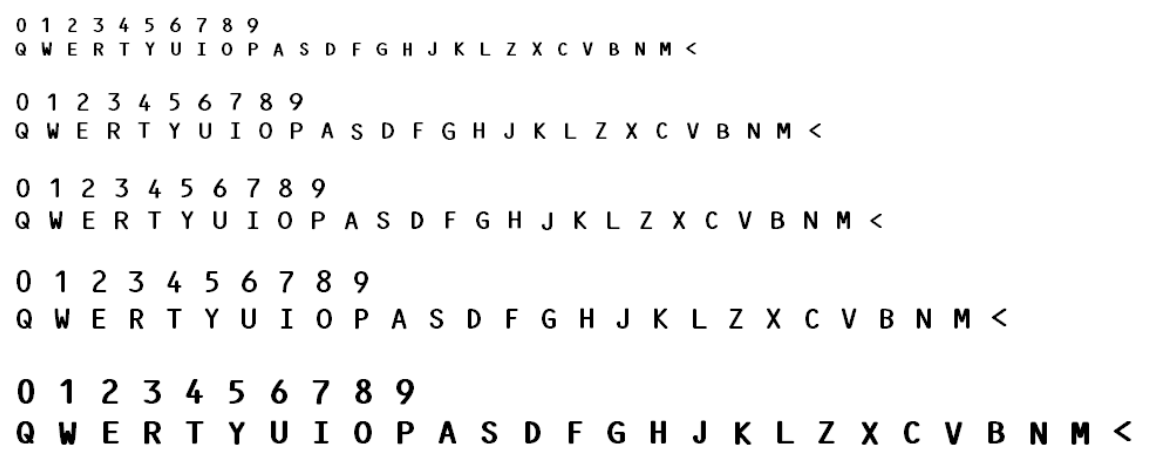 |
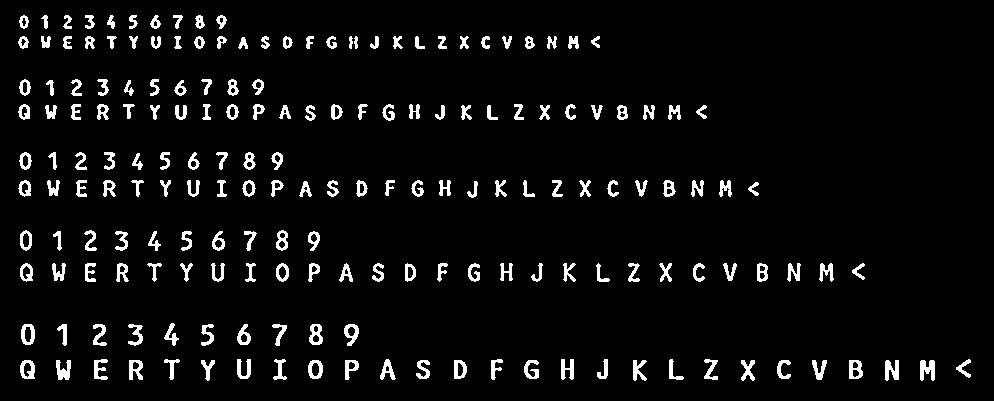
| 2 | Function put some neccessary filters on file with data:gray = cv2.cvtColor(im, cv2.COLOR_BGR2GRAY) blur = cv2.GaussianBlur(gray, (5, 5), 0) thresh = cv2.adaptiveThreshold(blur, 255, 1, 1, 11, 2)
In result we get: |
| 3 | In the next step function find characters, crop and scale it to size 20×20 pixels:image, contours, _ = cv2.findContours(thresh, cv2.RETR_EXTERNAL, cv2.CHAIN_APPROX_SIMPLE) for cnt in contours: if cv2.contourArea(cnt) > 20: [x, y, w, h] = cv2.boundingRect(cnt) if h > 10: im = copy.copy(im_copy) cv2.rectangle(im, (x, y), (x + w, y + h), (0, 0, 255), 2) roi = thresh[y:y + h, x:x + w] roismall = cv2.resize(roi, (20, 20))
In result we get 20×20 picture: |
| 4 | In the last step user is obligate to show computer what this letter is, writing it on keyboard. After this operation picture and the letter number is push to array in application memory. |
| 5 | When all characters are classified the arrays were save in drive np.savetxt('generalsamples.data', samples) np.savetxt('generalresponses.data', responses) |


2.2 Verify Engine
Testowanie i weryfikacja „nauczenia Sieci
| Step | Description |
|---|---|
| 1 | Inicjujemy Silnik sieci oraz ładujemy dane uczące: self.samples = np.loadtxt("generalsamples.data", np.float32) self.responses = np.loadtxt("generalresponses.data", np.float32) self.model = cv2.ml.KNearest_create() self.model.train(self.samples, cv2.ml.ROW_SAMPLE, self.responses) |
| 2 | Funkcja lądujemy obrazek z danymi testowymi.  w/w obrazek został przygotowany do testu pozytywnego (zakładamy że wszystkie znaki powinny być odczytane prawidłowo. Można w pliku do testu zapisać dane inna czcionka tak aby zweryfikować czy silnik „nie rozpoznaje” lecz w wielu Trzcionkach pewne znaki mogą zostać zinterpretowane prawidłowo. Nasz zespół skupił się na „porawidłowym” odczycie tylko i wyłącznie trzcionki OCR-B (tylko ta trzcionak występuje w dowodach osobistych MRZ) |
| 3 | Nakładamy niezbędne filtry |
| 4 | Na podstawie konturów extraktujemy pojedyncze linie (uwaga sprawdzamy czy są rozpoznane 3 linie (obligatoryjnie dowód posiada 3) i listę z parametrami położenia linii, w innym przypadku zwracamy None.ef extract_lines(self, image): line_list = {} # dilation cv2.imshow('input extract_line', image) kernel = cv2.getStructuringElement(cv2.MORPH_RECT, (10, 1)) img_dilation = cv2.dilate(image, kernel, iterations=3) # find contours image, contours, _ = cv2.findContours(img_dilation.copy(), cv2.RETR_EXTERNAL, cv2.CHAIN_APPROX_SIMPLE) for cnt in contours: [x, y, w, h] = cv2.boundingRect(cnt) # ic contour is big enough #print w * h if w * h > 5000: # wszystko co jest poniżej 5000 ignorujemy line_list[y] = [x, y, w, h] # sort contours print "Liczba Linii %s" % len(line_list) if len(line_list) == 3: return sorted(line_list.items()) else: print "Read Error, Detected Lines Count Error ! -> %s" % len(line_list) return None |
| 5 | Wycinamy obrazki każdej Lini na podstawie otrzymanych parametrów z extract_lines i przekazujemy je do funkcji OCR.def decode(self, image): if len(image) > 0 and image is not None: contours = self.extract_lines(image) MZR_lines = [] if contours is not None: for key, value in contours: # Get bounding box x, y, w, h = value line_image = image[y:y + h, x:x + w] MZR_lines.append(self.ocr(line_image)) cv2.imshow("linie", line_image) return MZR_lines return None |
| 6 | Funkcja OCR extraktuje z każdej linii znak przy użyciu funkcji extract_chars_from_line: def extract_chars_from_line(self, image): image, contours, _ = cv2.findContours(image, cv2.RETR_EXTERNAL, cv2.CHAIN_APPROX_SIMPLE) char_list = [] i = 0 lista_rect = {} for cnt in contours: [x, y, w, h] = cv2.boundingRect(cnt) if cv2.contourArea(cnt) > 10: char_list.append([x, y, w, h]) lista_rect[x] = [x, y, w, h] return sorted(lista_rect.items()) Następnie na podstawie zwróconych parametrów znaku funkcja OCR wycina obrazek, skaluje do rozmiaru 20×20 i przekazuje do Sieci KNN jako dane wejściowe. Jako informacje zwrotną sieć KNN zwraca kod rozpoznanego znaku. def validate(self, read_data): print "Read Data: %s" % read_data print "Test Data: %s" % self.test_lines read_line_count = len(read_data) test_line_count = len(self.test_lines) PASS_COUNT = 0; FAIL_COUNT = 0; if (test_line_count == read_line_count): for i in xrange(read_line_count): read_line_data = read_data[i] test_line_data = self.test_lines[i] if (len(read_line_data) == len(test_line_data)): for x in xrange(len(read_line_data)): if read_line_data[x] == test_line_data[x]: PASS_COUNT += 1 else: FAIL_COUNT += 1 else: return None else: return None print "Validation Summary: PASS: %s, FAIL: %s" % (PASS_COUNT, FAIL_COUNT) Accuracy = float(float(PASS_COUNT) / float(PASS_COUNT + FAIL_COUNT)) * 100 return Accuracy |
| 7 | Zwrócony String w postaci tablicy 3 linii porównujemy z wzorce. Zliczamy znaki dobrze rozpoznane i znaki zle rozpoznane na tej podstawie wyliczamy Accuracy naszego silnika.def validate(self, read_data): print "Read Data: %s" % read_data print "Test Data: %s" % self.test_lines read_line_count = len(read_data) test_line_count = len(self.test_lines) PASS_COUNT = 0; FAIL_COUNT = 0; if (test_line_count == read_line_count): for i in xrange(read_line_count): read_line_data = read_data[i] test_line_data = self.test_lines[i] if (len(read_line_data) == len(test_line_data)): for x in xrange(len(read_line_data)): if read_line_data[x] == test_line_data[x]: PASS_COUNT += 1 else: FAIL_COUNT += 1 else: return None else: return None print "Validation Summary: PASS: %s, FAIL: %s" % (PASS_COUNT, FAIL_COUNT) Accuracy = float(float(PASS_COUNT) / float(PASS_COUNT + FAIL_COUNT)) * 100 return Accuracy |
2.3 Photo MRZ Recognition
Zadaniem tego Modul jest zdekodowanie strefy MRZ ze zrobionego zdjęcia. Algorytm działania:
| Step | Description |
|---|---|
| 1 | Program Włącza kamerę i wyświetla obraz, użytkownik robi zdjęcie naciskając klawisz „SPACE” , klawisz „q” zamyka program i wraca do głównego Menu:def capture_process(self, cam): cap = cv2.VideoCapture(cam) while (True): ret, frame = cap.read() gray = cv2.cvtColor(frame, cv2.COLOR_BGR2GRAY) cv2.imshow('Camera data input', gray) key = cv2.waitKey(1) if chr(key & 255) == ' ': thresh = self.filtr(gray) text = self.locate_MZR(thresh, gray) print text if chr(key & 255) == 'q': break |
| 2 | Po zrobieniu zdjecia na obraz nakładane są niezbędne filtry a następnie obraz jest przekazany do funkcji oryginalny obraz oraz obraz z nałożonymi filtrami jest przekazany do funkcji locate_MRZ która to zlokalizuje i wekstraktuje strefę MRZ z dostarczonego zdjęcia. Funkcja filtr() - która lokalizuje strefe MRZ na dowodzie:def filtr(self, image): rectKernel = cv2.getStructuringElement(cv2.MORPH_RECT, (13, 5)) sqKernel = cv2.getStructuringElement(cv2.MORPH_RECT, (21, 21)) # load the image, resize it, and convert it to grayscal # smooth the image using a 3x3 Gaussian, then apply the blackhat # morphological operator to find dark regions on a light background gray = cv2.GaussianBlur(image, (5, 5), 0) blackhat = cv2.morphologyEx(gray, cv2.MORPH_BLACKHAT, rectKernel) # compute the Scharr gradient of the blackhat image and scale the # result into the range [0, 255] gradX = cv2.Sobel(blackhat, ddepth=cv2.CV_32F, dx=1, dy=0, ksize=-1) gradX = np.absolute(gradX) (minVal, maxVal) = (np.min(gradX), np.max(gradX)) gradX = (255 * ((gradX - minVal) / (maxVal - minVal))).astype("uint8") # apply a closing operation using the rectangular kernel to close # gaps in between letters -- then apply Otsu's thresholding method gradX = cv2.morphologyEx(gradX, cv2.MORPH_CLOSE, rectKernel) thresh = cv2.threshold(gradX, 0, 255, cv2.THRESH_BINARY | cv2.THRESH_OTSU)[1] # perform another closing operation, this time using the square # kernel to close gaps between lines of the MRZ, then perform a # series of erosions to break apart connected components thresh = cv2.morphologyEx(thresh, cv2.MORPH_CLOSE, sqKernel) thresh = cv2.erode(thresh, None, iterations=4) # during thresholding, it's possible that border pixels were # included in the thresholding, so let's set 5% of the left and # right borders to zero p = int(image.shape[1] * 0.05) thresh[:, 0:p] = 0 thresh[:, image.shape[1] - p:] = 0 return thresh
Wynik działania funkc: Na miało zaznaczone są zlokalizowane obszary tekstu: def locate_MRZ(self, _thresh, _oryginal): _oryginal = cv2.adaptiveThreshold(_oryginal, 255, 1, 1, 11, 2) cnts = cv2.findContours(_thresh.copy(), cv2.RETR_EXTERNAL, cv2.CHAIN_APPROX_SIMPLE)[-2] cnts = sorted(cnts, key=cv2.contourArea, reverse=True) if len(cnts) > 0: (x, y, w, h) = cv2.boundingRect(cnts[0]) # Shape[1] jest najwiekszy zatem to zawsze bedzie MZR pX = int((x + w) * 0.03) pY = int((y + h) * 0.03) (x, y) = (x - pX, y - pY) (w, h) = (w + (pX * 2), h + (pY * 2)) result = _oryginal[y:y + h, x:x + w].copy() return self.decode(result)
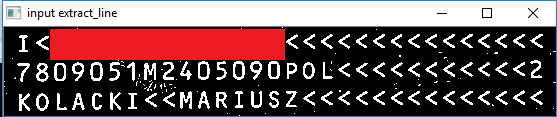
Wynik dziłania funkcji locate_MRZ: |
| 3 | Takie zdjęcie przekazane jest do funkcji Decode() która wycina obrazki każdej Lini na podstawie otrzymanych parametrów z extract_lines i przekazujemy je do funkcji OCR.def decode(self, image): if len(image) > 0 and image is not None: contours = self.extract_lines(image) MZR_lines = [] if contours is not None: for key, value in contours: # Get bounding box x, y, w, h = value line_image = image[y:y + h, x:x + w] MZR_lines.append(self.ocr(line_image)) cv2.imshow("linie", line_image) return MZR_lines return None |
| 4 | Funkcja OCR extraktuje z każdej linii znak przy użyciu funkcji extract_chars_from_line: def extract_chars_from_line(self, image): image, contours, _ = cv2.findContours(image, cv2.RETR_EXTERNAL, cv2.CHAIN_APPROX_SIMPLE) char_list = [] i = 0 lista_rect = {} for cnt in contours: [x, y, w, h] = cv2.boundingRect(cnt) if cv2.contourArea(cnt) > 10: char_list.append([x, y, w, h]) lista_rect[x] = [x, y, w, h] return sorted(lista_rect.items()) Następnie na podstawie zwróconych parametrów znaku funkcja OCR wycina obrazek, skaluje do rozmiaru 20×20 i przekazuje do Sieci KNN jako dane wejściowe. Jako informacje zwrotną sieć KNN zwraca kod rozpoznanego znaku. def ocr(self, image): self.clear_folder('./log/ocr_img/') result = "" chars = self.extract_chars_from_line(image) i = 0 for key, value in chars: x, y, w, h = value if h > 10: # cv2.rectangle(oryginal,(x,y),(x+w,y+h),(0,255,0),2) # cv2.imshow('oryginal', oryginal) roi = image[y:y + h, x:x + w] roismall = cv2.resize(roi, (20, 20)) file_name = "./log/ocr_img/%s" % i self.save_image_to_png(roismall, file_name) roismall = roismall.reshape((1, 400)) roismall = np.float32(roismall) retval, results, neigh_resp, dists = self.model.findNearest(roismall, k=1) string = str(chr((results[0][0]))) result += (string) return result |
| 5 | Wynik jest zwracany na konsolę w formie tekstowej. |
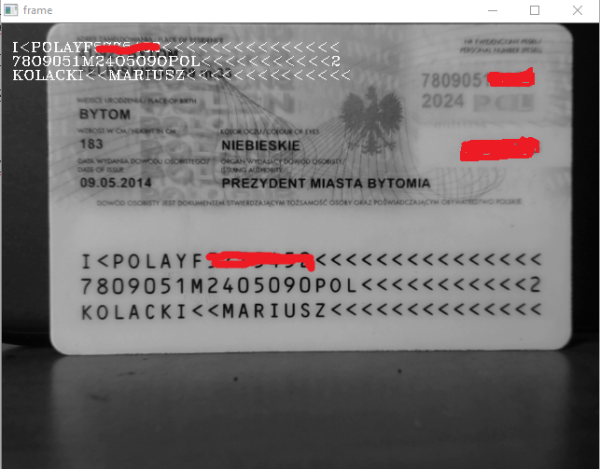
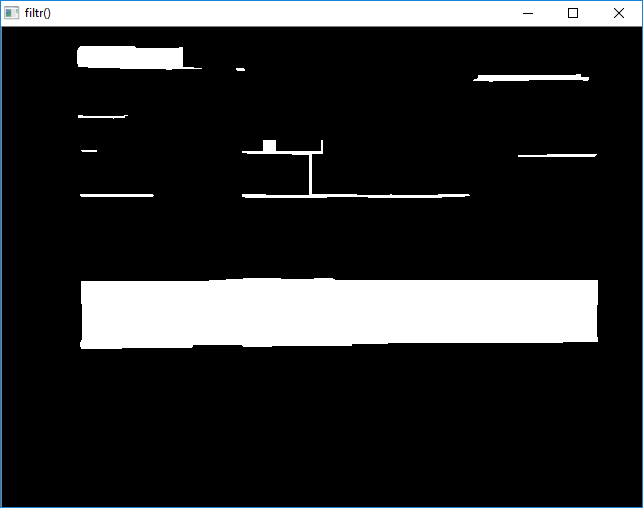 następnie ten obraz przekazujemy do funkcji locate_MRZ, która rzyjmuje że największy „bialy” obszar jest obszarem MRZ i na tej podstawie wycina dane ze zdjęcia oryginalnego (celowo zamaskowano nr dowodu) :
2.3 Video MRZ Recognition
Zadaniem tego Modul jest zdekodowanie strefy MRZ „live” na podstawie strumienia danych z kamery dostarczanym w czasie rzeczywistym. Funkcja ta nie wymaga naciskania SPACE, wszystko dzieje się automatycznie i po wykryciu 3 linie w strefie MRZ dane zostają zdekodowane a wynik zostaje naniesiony na strumien danych wejsciowych. Dekodowanie odbywa się dokładnie tak samo jak w 2.3 „Photo MRZ Recognition ” pkt 2-4